ScanPro 3000
Scan Pro 3000
Getting Started
Use this section to get an understanding of how to start using the
ScanPro 3000.
NOTE: Any files saved to the computer will automatically be deleted when the computer shuts down or restarts. Make sure to save any scans to a flash drive or email them to yourself. Any lost files will have to be rescanned.
![]() To use the ScanPro 3000, the first thing you need to do is start up the computer and ScanPro device. The power switch for the ScanPro is located on the back of the device on the right-hand side. Once the computer has finished booting to the desktop, you can start the PowerScan 3000 software by clicking on the PowerScan 3000 icon on the desktop.
To use the ScanPro 3000, the first thing you need to do is start up the computer and ScanPro device. The power switch for the ScanPro is located on the back of the device on the right-hand side. Once the computer has finished booting to the desktop, you can start the PowerScan 3000 software by clicking on the PowerScan 3000 icon on the desktop.
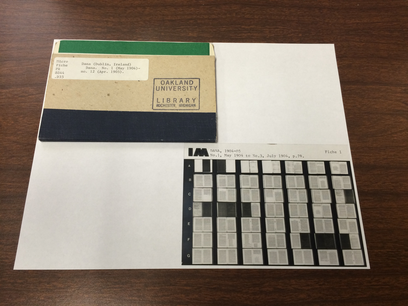
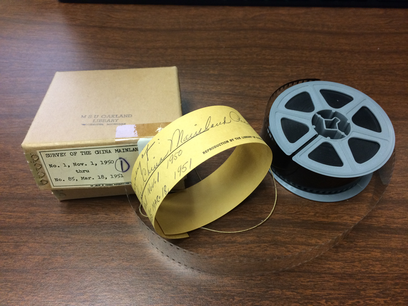
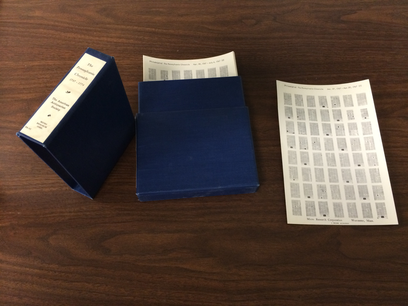
As the program is initializing, take a moment to detect what type of microform you are going to be scanning with the ScanPro 3000. Currently, the Oakland University Kresge Library has three different types:
Each of the different types of film can be viewed and scanned with the ScanPro 3000. Click on one of the above formats for information about scanning that type of microform.
PowerScan 3000
This is the software the ScanPro 3000 uses to capture pages from the microforms.
Using this application, you can capture and print high resolution images and/or create searchable PDF files of the scanned document and transfer them to another machine for future use.
The searchable PDF files are called OCR(Optical Character Recognition) PDF files and are fully searchable using a PDF viewer, such as Adobe Reader.
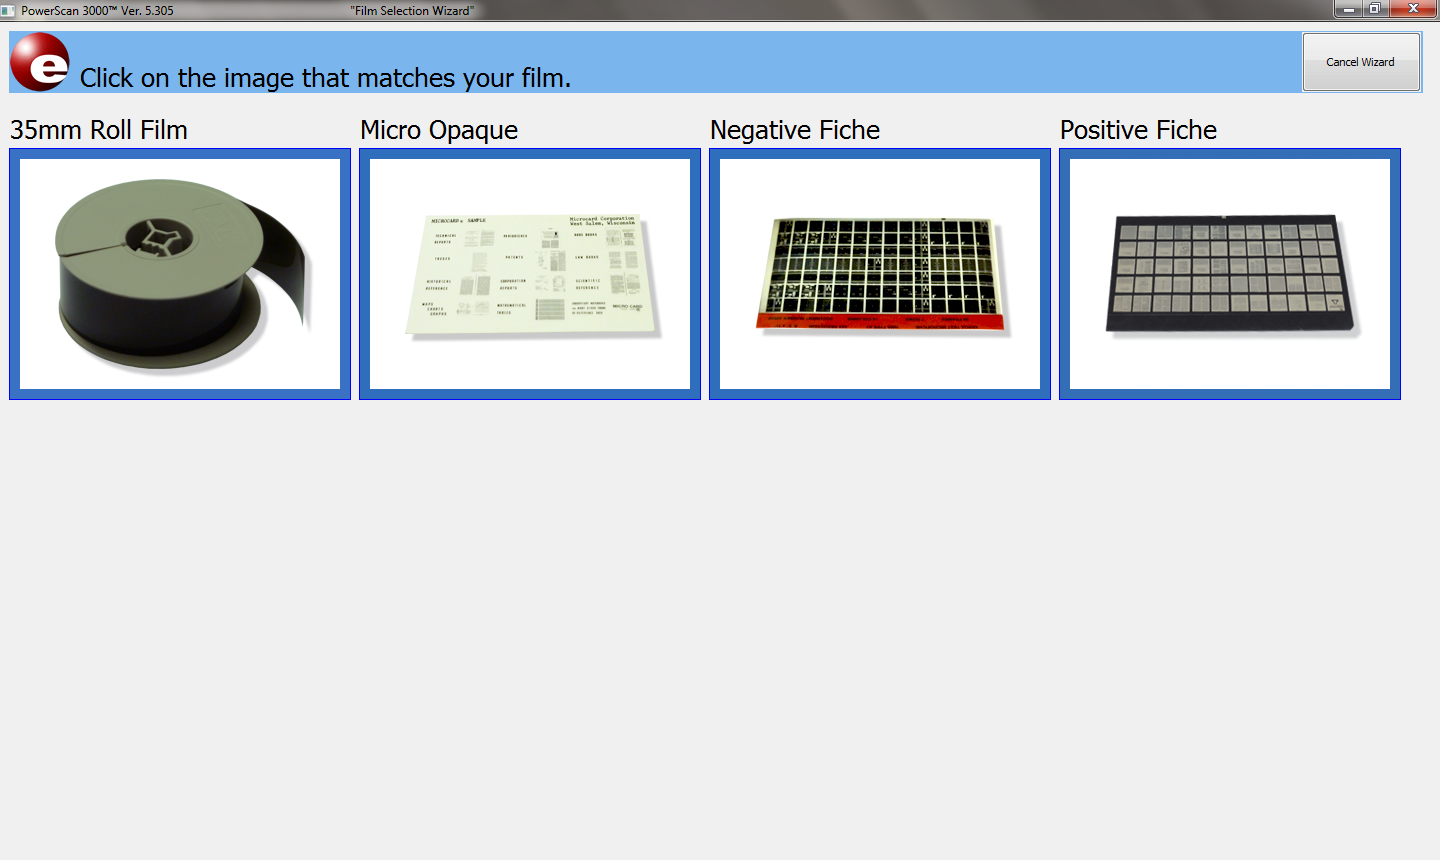
This is the PowerScan Wizard that appears when you start the PowerScan 3000 software. Click on the icon that looks like the microform you will be viewing.
For help on setting it up on the ScanPro 3000, click on one of the links below to jump to that section.
- For the Micro-Film, select '35mm Roll Film'.
- For the Micro-Opaque, select 'Micro Opaque'.
- For the Micro-Fiche, select either 'Positive Fiche' or 'Negative Fiche'.
Micro-Fiche
Use this section to learn how to insert the Positive and Negative Micro-Fiche into the ScanPro 3000.
A 'Positive Fiche' has images with dark print on a clear background. The microform itself is mostly black.
A 'Negative Fiche' has images with clear print on a dark background. The microform itself is mostly clear.
After selecting either the 'Negative Fiche' or 'Positive Fiche' button on the PowerScan Wizard, a green light should illuminate from the ScanPro 3000 machine. Pull out on the tray as far as it will go, making sure the glass is between the two arms of the film spool holder. The top of the glass tray should separate from the bottom. You should now insert the fiche face up and away from you. Like you would show a picture to someone sitting across from you.
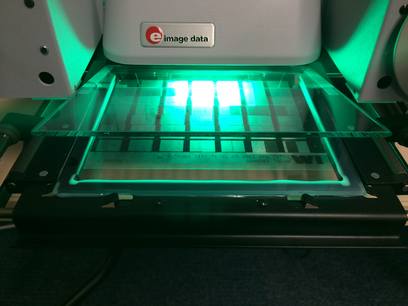
Once you have inserted the Micro-Fiche card, you can slide the tray (in, out, left, or right) to find the page you would like to view.
Now that you have found the page, you may need to adjust the image to be visibly clearer. If so, continue to the 'Adjusting the Image' Section.
Micro-Film
Attaching the 35mm Roll Film to the ScanPro 3000 can be tricky. Use this section to become an expert!
After selecting the '35mm Roll Film' button on the PowerScan Wizard, a green light should illuminate from the ScanPro 3000 machine. Pull out on the tray as far as it will go, making sure the glass is between the two arms of the film spool holder. The top of the glass tray should separate from the bottom.
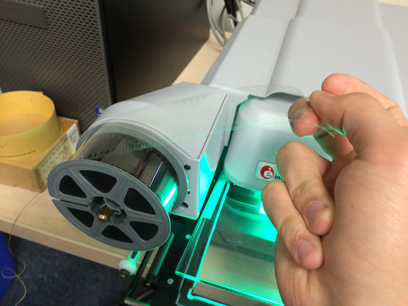
1. Load the 35mm Roll Film onto the left-hand spool. The film end should come up from the left-hand side, meaning the film will spin clockwise when moving to the next page.
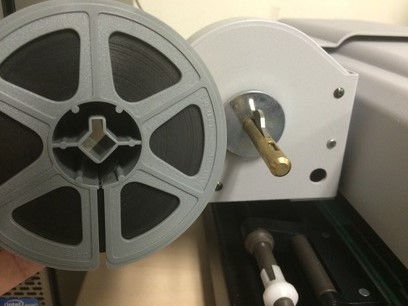
Make sure to align the metal bar in the slot correctly.
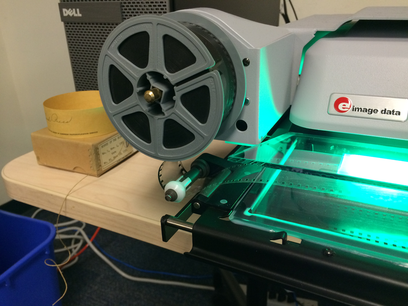
2. Pull out the film far enough to be able to wrap it around the bottom roller and in-between the glass plates.
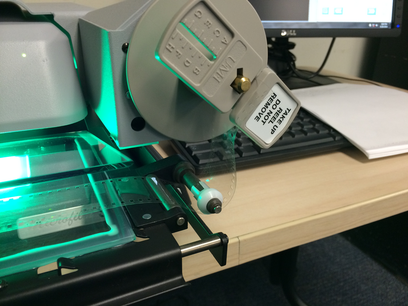
3. Pull enough film and wrap it underneath the roller on the right hand side of the machine.
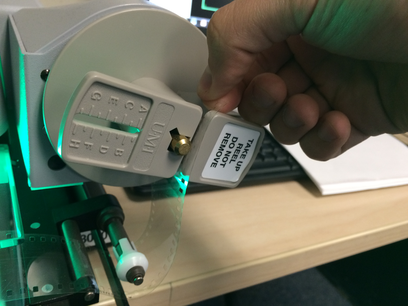
4. To load the film roll onto the right hand spool, pull the film from under the second roller and load it into the side*. The end of the roll should just barely stick out of the other end.
*Note: Trying to load it from underneath is possible; but it is much more difficult.
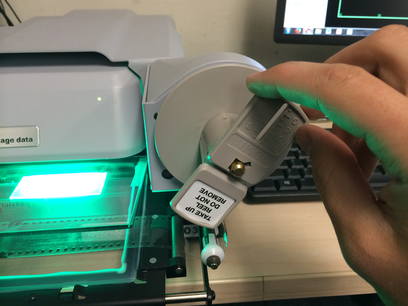
5. Begin winding up the spool by hand in the clockwise direction until there is no clear film showing.
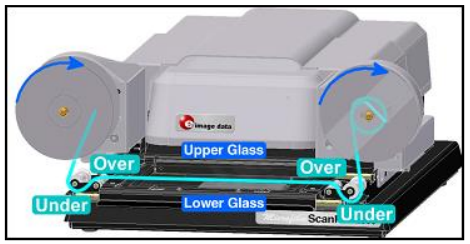
Once you have finished loading the film onto the ScanPro 3000, it should look approximately like the above image. You can then slide the tray in and use the Motorized Roll Film Control(located on the right hand side of the PowerScan 3000 program window) to find the page you want.
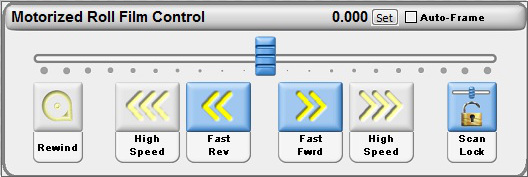
To use the Motorized Roll Film Control, simply click and drag the blue slider to the left or right to advance or retreat the film on the roll, repectively. More information about the Motorized Roll Film Control can be found in the 'Common Image Adjustments' Section.
Once you have found the page you want, you may need to adjust the image to be visibly clearer. If so, continue to the 'Adjusting the Image' Section
Micro-Opaque
Learn how to insert the Micro-Opaque cards into the ScanPro 3000 machine by reading this section.
After selecting the 'Micro Opaque' button on the PowerScan Wizard, a green light should illuminate from the ScanPro 3000 machine. Pull out on the tray as far as it will go, making sure the glass is between the two arms of the film spool holder. The top of the glass tray should separate from the bottom.
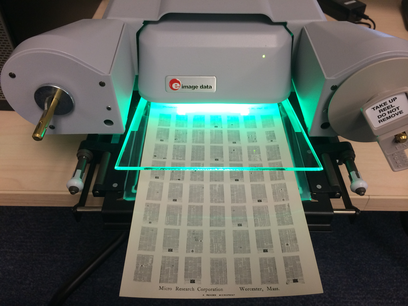
With the Micro-Opaque card inserted, you can now slide the tray in.
Only the pages in the glass tray can be viewed, you may have to take the Micro-Opaque card out and rotate it 180° to be able to view the other half.
If that is the case, you may have to click the Rotate 90° button twice to get the image to show correctly.
Once you have found the page you want, you may need to adjust the image to be visably clearer. If so, continue to the 'Adjusting the Image' Section
Adjusting the Image
If you are having trouble viewing the image with the PowerScan 3000 software, use this section to learn about the various options you can use to optimize the image.
Menu Options
The HOME options are a set of options that can be helpful when viewing an image.
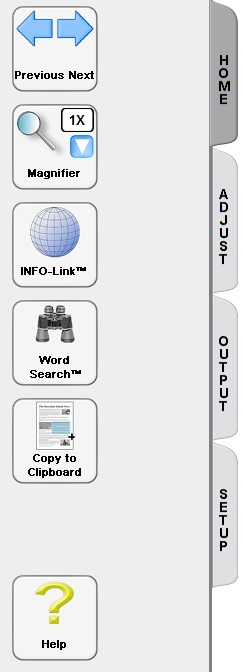
Previous Next is helpful when you are using the 35mm Film Rolls and want to move to the next page without doing so manually. Click on the arrows to go one page in either direction. You do not have to do any type of set-up, the PowerScan program automatically figures out how far to move for the next page.
Magnifier is helpful when you want to view a closer look at a section of a page. A window will appear that shows you a magnification of what is selected by the dotted blue box.
INFO-Link will allow you to click on a word in the PowerScan program and search an online resource like Wikipedia or a dictionary for more information.
Word Search allows you to search for text located on the page you are viewing in PowerScan 3000.
Copy to Clipboard is helpful when you want to highlight information and copy it to another document, such as Microsoft Word. This can be done in the PowerScan program. You do not need to save the page first.
Help will give you more information about the next selected button.
Once you have the image centered on the screen for viewing, you can use the ADJUST menu options to fine tune the picture for optimal viewing.
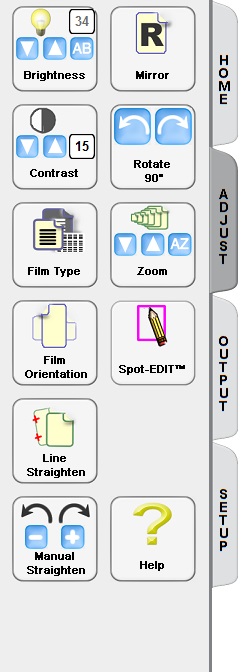
Brightness is helpful when the image you are viewing is either too bright or too dim. You can click on AB to automatically adjust the brightness.
Contrast will allow you to adjust the difference between the brightest whites and the darkest blacks.
Film Type lets you change what kind of film the scanner is viewing. Options are negative film, positive film, or micro opaque.
Film Orientation will rotate the camera 90° to match the orientation of the image on the film.
Line Straighten allows the user to create a line with two clicks. The PowerScan 3000 program will automatically adjust to that line.
Manual Straighten gives the user control over straightening the image. The - button rotates the image counter-clockwise while the + button rotates the image clockwise.
Mirror will correct an image that is showing up with the text backwards.
Rotate 90° rotates the image on the screen 90° in either direction.
Zoom will move the ScanPro 3000's optical camera closer or further away from the microform.
Spot-EDIT will allow you to make changes to very specific areas of the page. After selecting the desired area, you can then adjust the Brightness and Contrast.
When you are finished setting up the image and would like to save it or print it, the OUTPUT menu has several buttons to finish the job.
NOTE: Any files saved to the computer will automatically be deleted when the computer shuts down or restarts. Make sure to save any scans to a flash drive or email them to yourself. Any lost files will have to be rescanned.
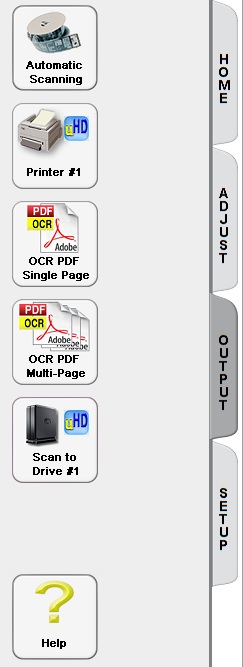
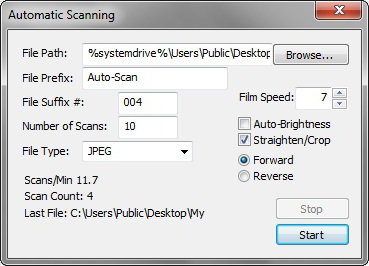
Automatic Scanning will bring up the dialog above and enables you to save multiple images from a 35mm film roll automatically. You can select anywhere from 1 image to the entire roll.
Printer #1 will print anything within the green dotted line to the default printer.
OCR PDF Single Page & Multi Page will create a word-searchable PDF file. To save the OCR PDF file, you must first select the button and then click on the Scan to Drive #1 button. Do not click on the Finish button until you have scanned your last page.
Scan to Drive #1 will save to the My Scans folder located on the Desktop. This button will give you the option to save as various file types. It is set as PDF by default.
Common Image Adjustments
Use this section to learn about common adjustments that are done to the images.
Adjusting the Brightness is a very simple procedure that can also be somewhat tricky. On occasion, the Brightness level(indicated by the number on the Brightness button) can work well for one part of the page but not another part. If that is the case, skip ahead to the section
Enhancing the Document with Spot-EDIT.
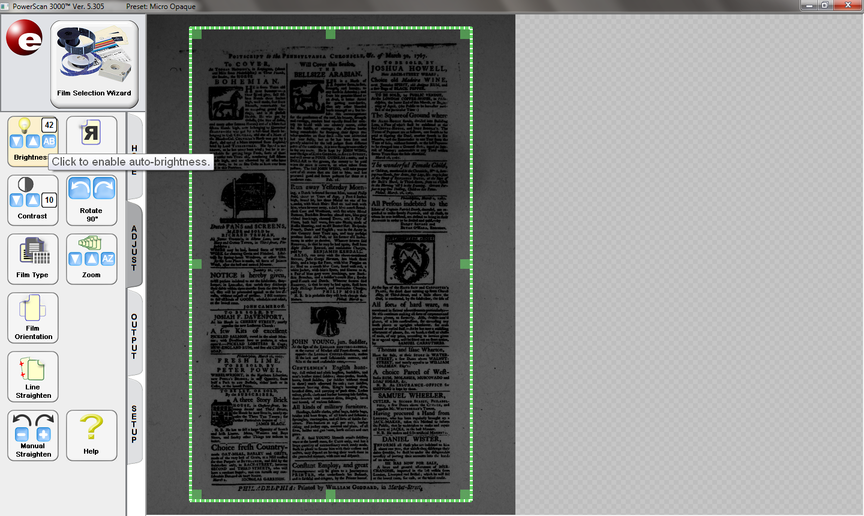
The easiest way to adjust the Brightness is to click on the 'AB'(Automatic Brightness) button located on the Brightness option.
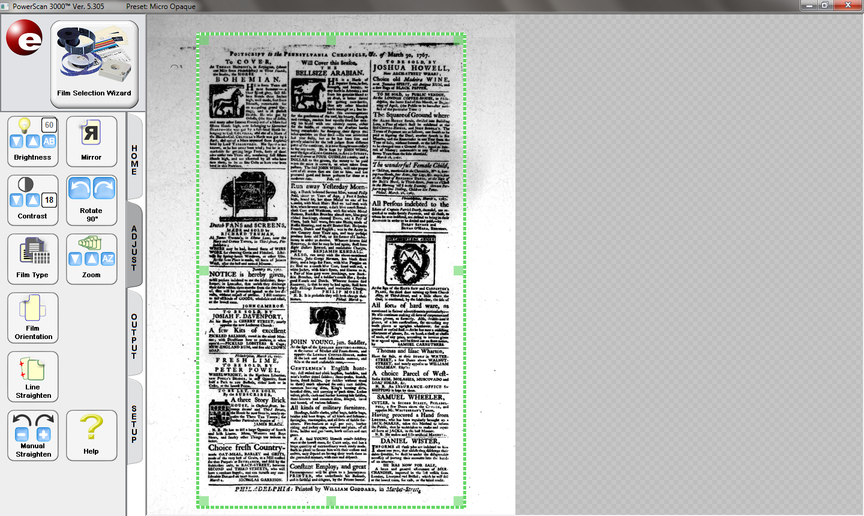
This will automatically adjust the pages Brightness to a readable level, along with automatically adjusting the contrast. For further fine-tuning of the Brightness, you can click on the up and down arrows to increment the Brightness level by 1.
The easiest method for adjusting the Contrast is actually by clicking on the 'AB'(Automatic Brightness) button located on the Brightness option. This will adjust the Contrast for you automatically as well as the Brightness. If you need to fine tune the Contrast follow the instructions below.

If you notice that the text on a page looks very blotchy and letters are slightly bleeding into each other, the Contrast is most likely too high. Click on the down button to adjust accordingly.
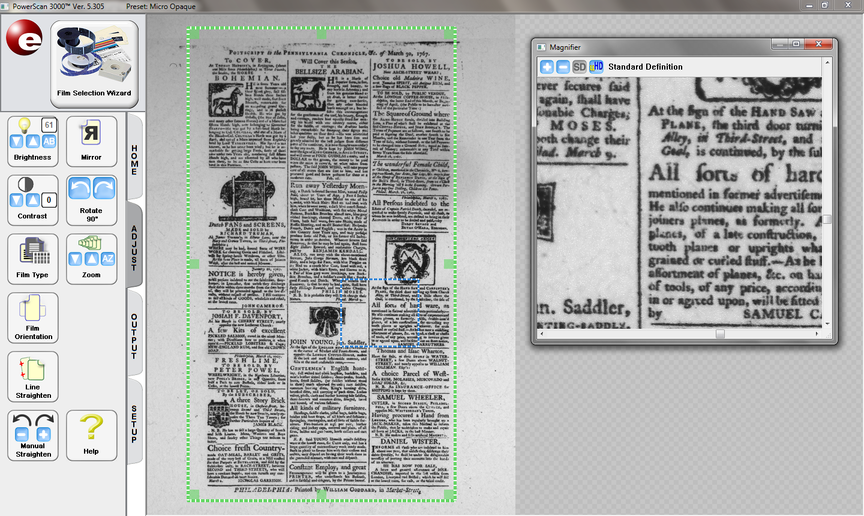
When everything on the page has a gray tone to it, the Contrast may be too low. Try increasing the Contrast to show a larger difference between the text and background.
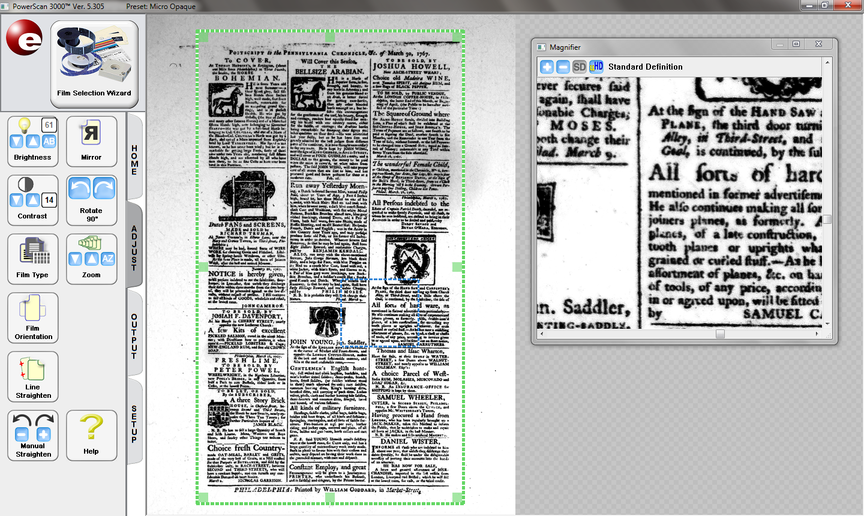
This is a great example of how a page should look after adjusting the Contrast. The background is white and the text isn't bleeding into itself.
Enhancing the Document with Spot-EDIT
Spot-EDIT is a very helpful tool that is great to use when you want to either alter specific portions of the page or completely remove sections before you save or print.
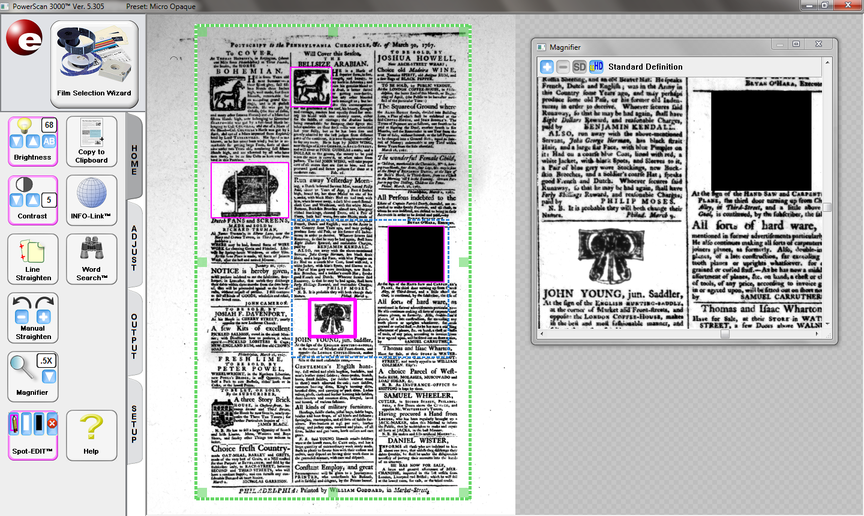
To begin using the Spot-EDIT tool, click on the button. From there you will see the icon change to include 4 buttons within. From the left, we have the 'select', 'white-out', 'black-out', and 'remove' tools. By default, the 'select' tool is highlighted. This is used to select portions of the page to edit.
Once you have chosen the location(initiated by 2 clicks of the mouse), you can then do 1 of 5 things to the selected location.
- You can adjust the Brightness and Contrast by clicking their respective buttons(for more information on adjusting Brightness and Contrast, check out those sections above).
- You can also fill in the selected region with the colors white and black by selecting either the 'white-out' or 'black-out' button.
- The last option you have after selecting a region is to cancel. By selecting the 4th sub button in Spot-EDIT, you will remove any changes done to that region.
Looking at the image above, you can see there are a total of 4 selected regions on the page. Each region, once altered, can be selected again by clicking on the 'select' tool and clicking within the pink region. Once you have finished with the alterations you can then go to the Output tab to save or print the page. You can even use the Spot-EDIT tool on each page if you are saving as a multi-page PDF.
The magnifier is a great tool when you are reading a page and can't see due to the size of the text.
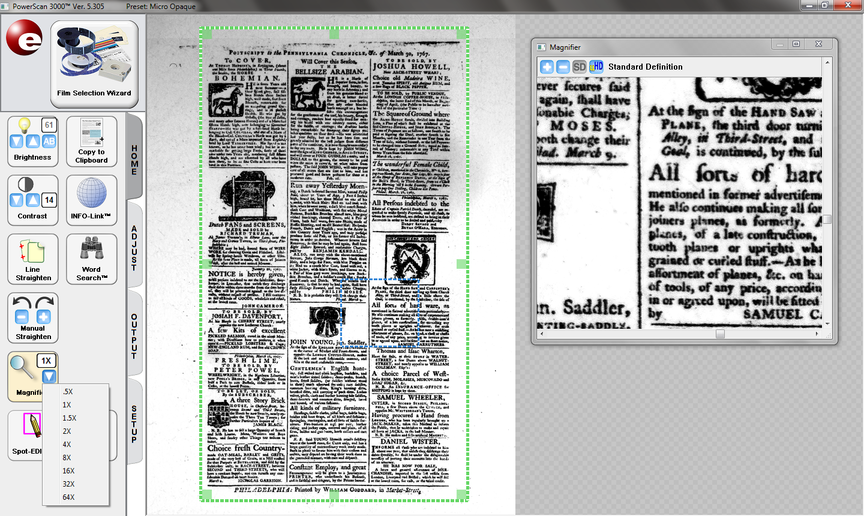
When you click on the magnifier button, a blue dotted square will appear on the page along with a Magnifier window. You can click inside the square and drag it around the page to magnify that section.
The Magnifier window will show the contents of the square and has several buttons at the top. The buttons are, 'Increase Magnification', 'Decrease Magnification', 'Standard Definition', and 'ultra-High Definition'.
You can also change the level of magnification by selecting the down arrow on the Magnifier button and selecting the level. The number above that is the Magnification level.
Multi-Page PDFs are very helpful when you have numerous pages you want to capture but don't want to have multiple documents.
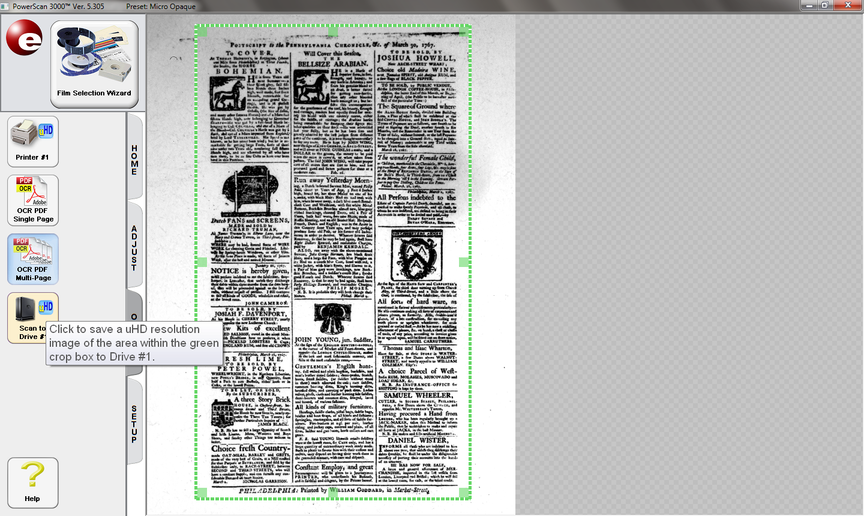
To create a Multi-Page PDF, click on the 'OCR PDF Multi-Page' button. Once you have adjusted your page to your liking, click on the 'Scan to Drive #1' button. This will bring up the Save As dialog.
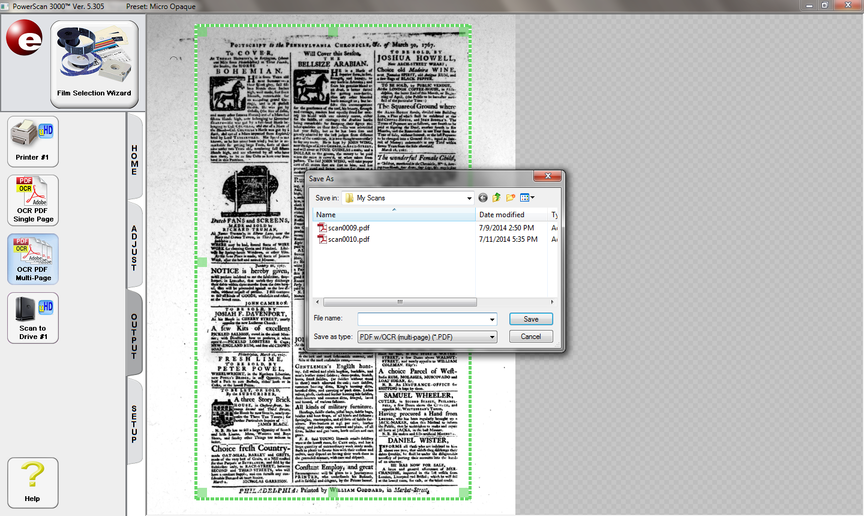
When the Save As dialog pops up, choose the location where it will save (by default, it will save to the folder My Scans located on the Desktop) and what the File Name will be. Then click on the Save button.
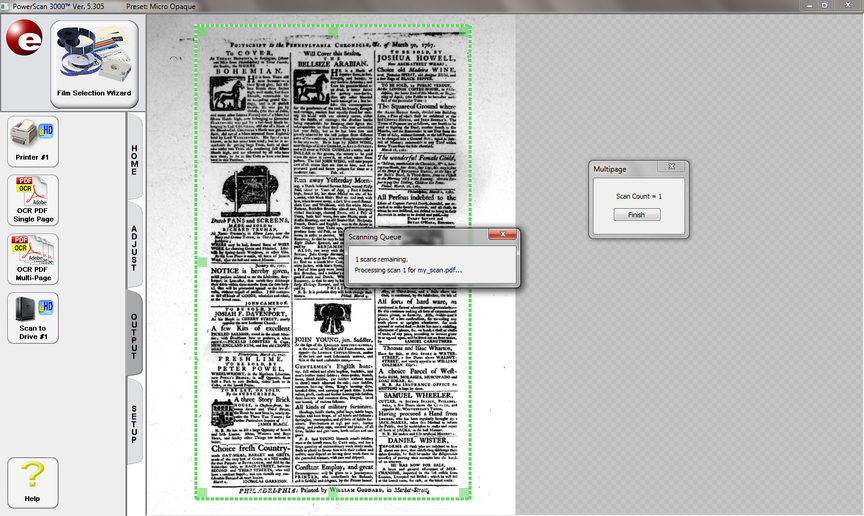
After you have clicked Save on the Save As dialog box, two new windows will appear. The one that says Multipage at the top is very important; you should never click finish until you are done scanning your last page. The other window is the Scanning Queue. This simply tells you that the PowerScan 3000 program is currently working on scanning a page.
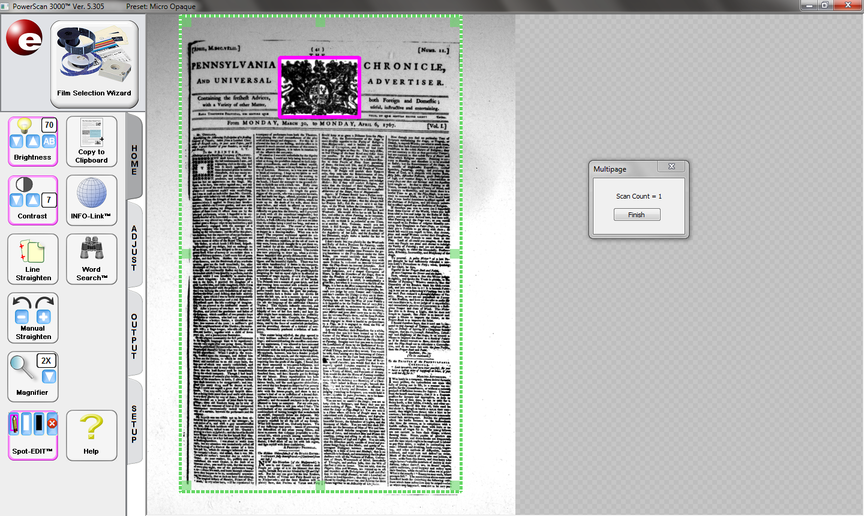
In the middle of scanning multiple pages, you can stop and use Spot-EDIT to make minor changes. You can also make changes to the entire page by adjusting the Brightness or Contrast without interrupting the multi-page scan.
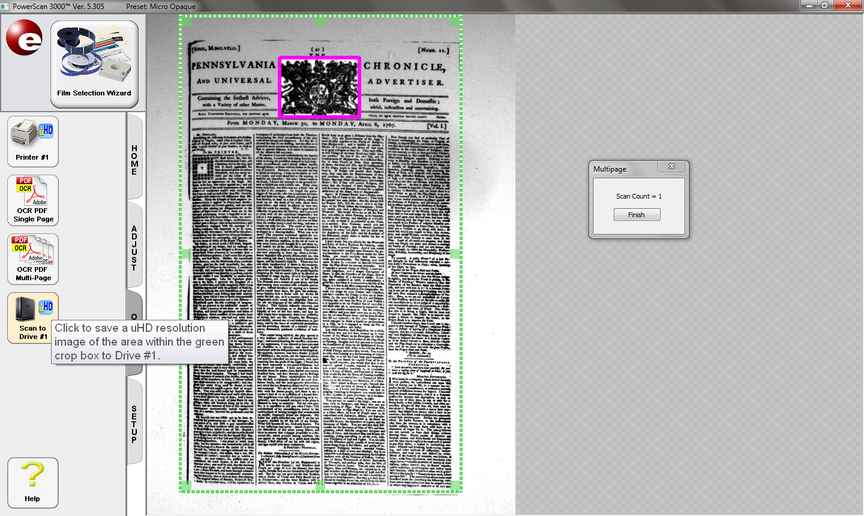
After each page has been edited to produce the best image, click on the 'uHD' button within the Scan to Drive #1 option to save that page as an ultra-High Definition scan. You can also click on the Scan to Drive #1 option to save as a standard definition scan.
Once you have finished with every page, you can then click on the 'Finish' button on the Multipage window. The PowerScan 3000 program will save your document and you are free to initiate another scan or stop using the program.
Straightening a page is a very easy procedure. The best way to quickly change the orientation of the page is to use the Line Straighten button.
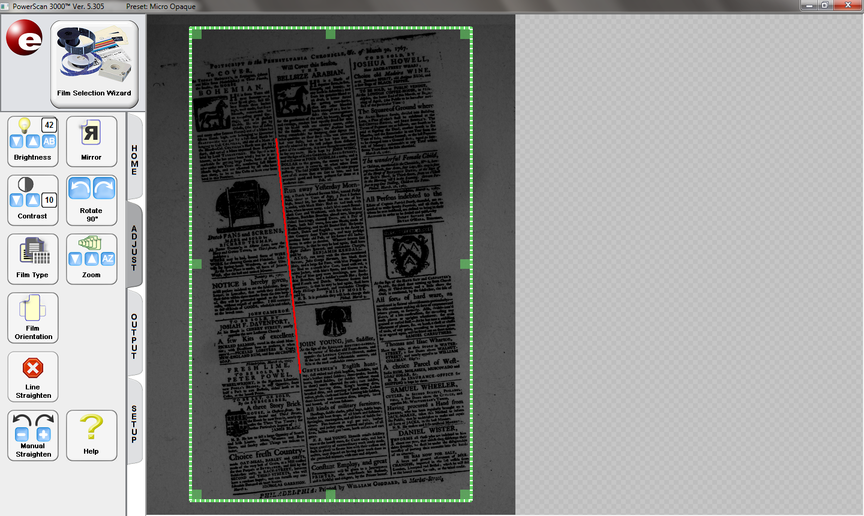
Once you select the Line Straighten button, you can either select it again to cancel or click on a spot on the page to begin. A good spot to place your first click is on a spot at the top of a line you want vertical. In the above example, there was a column separating line that I clicked on near the top. You then want to follow that line near the bottom of the page and click the second point.
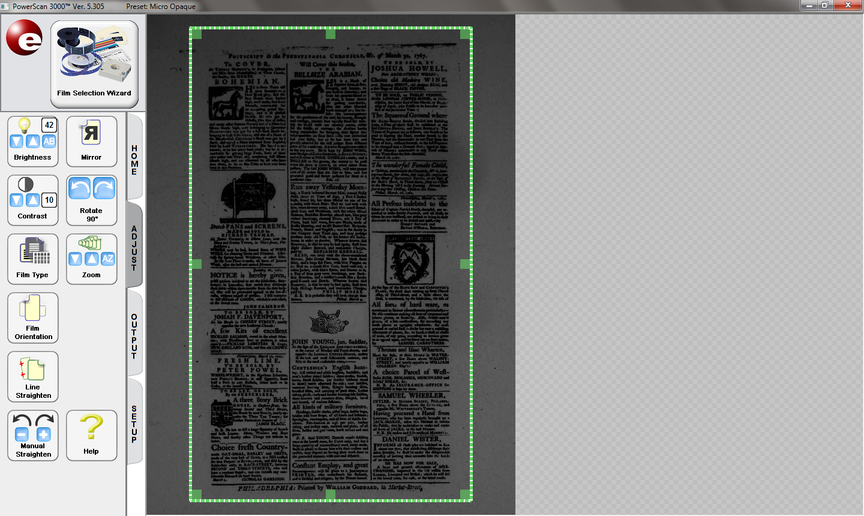
After selecting your second point, the image should automatically adjust to orient vertically. You may need to use the Manual Straighten button to make small minor adjustments if it still looks slightly off.
The Automatic Scanning feature is a very helpful tool to use when you are scanning multiple pages from a 35mm Roll Film.
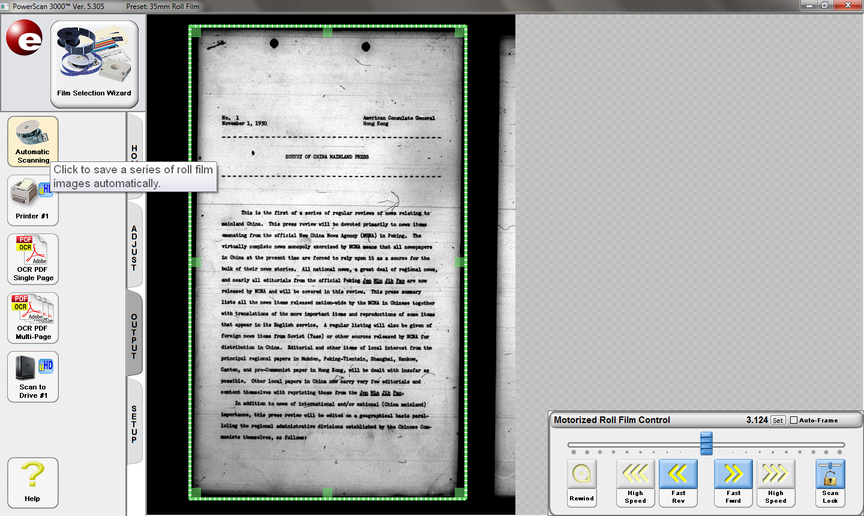
To get started, click on the Automatic Scanning button. This will launch the Automatic Scanning window.
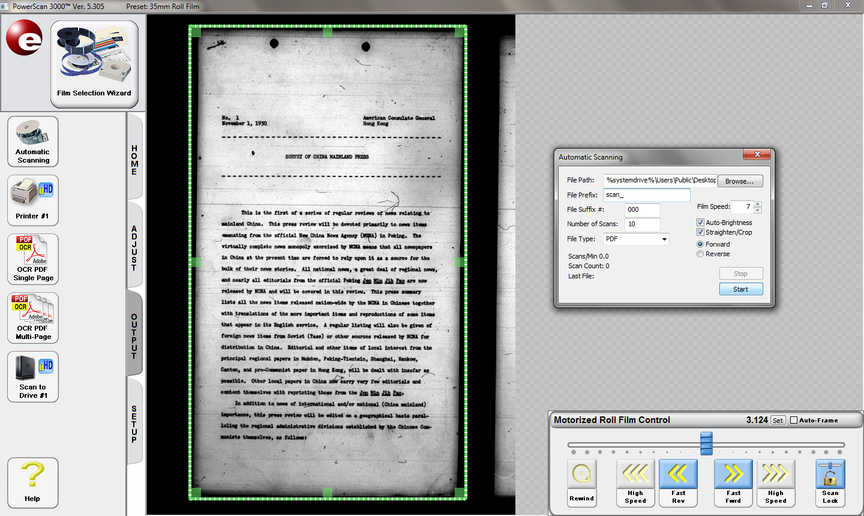
There are several options you can change on the Automatic Scanning window.
- If you click Browse, you can select the location for where you would like to save the scan. By default, it is set to save in the My Scans folder located on the Desktop.
- You can change the File Prefix to append the beginning of the file with a specific text.
- The number of scans is how many pages you wanted to automatically scan.
- File Type can be changed to a multitude of types; this is set to PDF by default.
- Film Speed is set to 7 by default and is the rate at which the film moves between scans.
- Auto-Brightness is not selected by default, it is recommended to turn this feature on as it will automatically adjust the Brightness and Contrast before it scans each page.
- Straighten/Crop is automatically selected and does exactly that before it scans.
- Forward and Reverse are the direction the film will move as it scans each page.
Once you have selected your options, click Start to begin the process.
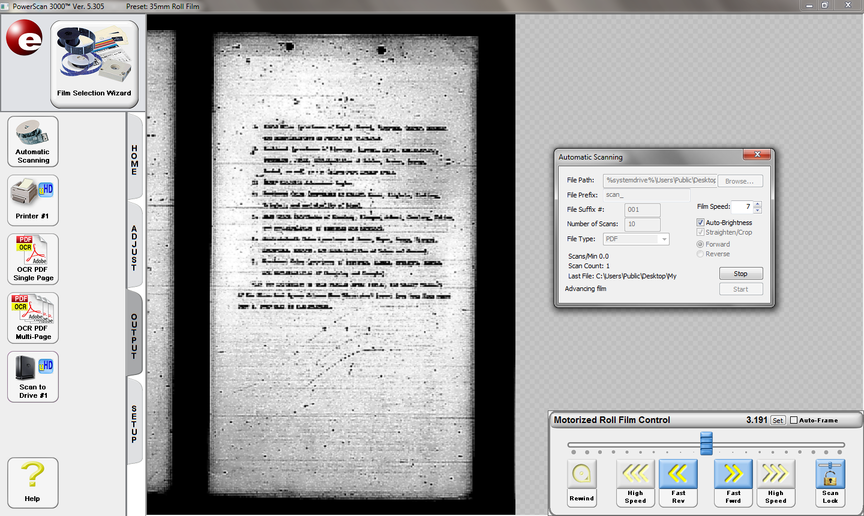
You will notice the scan beginning to take place. The pages will blur as they transition between each one. Once it stops at a page it will automatically adjust the Brightness, Contrast, Straightening, and Crop if those options were selected. Once it is finished, you can check out your document by going to where you saved it.
When using the 35mm Film Rolls, you have the option of using the Motorized Roll Film Control. This handy tool automatically winds and unwinds the roll at higher speeds than possible by hand.

When you first load the film and the glass slide is still open, you have the option of using a couple options that you would not otherwise be able. Available to you are the 'Rewind' and 'High Speed' options. The 'Rewind' button is useful when you are done using the Film and would like to wind it completely back up onto its' original spool. When you double click the 'Rewind' button, it will VERY rapidly unroll and wind itself back up. Just as a warning, it can be a little startling when you do it for the first time.

When you slide the tray in and are viewing the image, you have to option to use the 'Fast Rev', 'Fast Fwrd', and the slider tool located above the buttons. By simply clicking and dragging the slider, you can quickly or slowly go back and forth on the film roll.
Having Trouble?
Visit our student technology mentors located at the Technology Help Desk on the 2nd floor of the Library!
Or give them a call at 248-370-4410.
Created by Josh LeVoir / Updated on May 1, 2019 by JEL


